
Big Red Button
So how to get a BRB in a Miata?It's actually not very difficult. It's possible to simply modify the hazard light button, as detailed by Sean Archer in his writeup. I had been thinking about a BRB in place of the cigarette lighter for a couple of years, however. It seemed to be in the perfect place.
Before we get started, I'm going to insert the usual disclaimers. If you're not comfortable working with electrical circuits, the starting circuit of your car is NOT the best place to learn. These instructions are based on a Canadian 1990, and your car may vary. According the wiring diagrams, a US 1990 is the same. And of course, if you set your car on fire -I've never heard of you or this web page.
Parts list for my setup:
Tools:
The first step is finding the perfect button. The cigarette lighter is a 22.5 mm hole. That's easy - Cutler Hammer carries a number of buttons in this size. I chose an E22E2C - red, non-illuminated, NO/NC protruding button with a chrome bezel. There's a bewildering number of possibilities in button colour, bezel style, illumination, flush buttons, etc. My particular choice cost $27 Cdn with taxes, purchased at a local contracting shop. It's possible that you could get away with a single NO button, which would also drop your cost. This will be discussed later.
To install the button, you first remove the panel below the steering wheel. Two screws and it pops out. If you've got a Momo wheel like I do, it's a lot easier if you pull the steering wheel for some working space. There's not much room under there.
If you've got a C-H button like mine, it's modular. You only want to install the actual button and bezel right now. Leave the switching units out. To remove the cigarette lighter, you first unplug the connector that delivers the power. If you're dependent on a power source in your car for radar detectors or cellphones or 12v blenders, you can simply attach this to an extension socket that comes out behind the seat.
Once the lighter is unpowered, remove it. Turn it as you pull it out, and it should come out fairly easily.
You'll notice that there's a metal cup that surrounds the lighter. You can keep this or toss it. It's a matter of aesthetics, really. Since your BRB won't be getting hot like your lighter did, it's not really NEEDED. I liked the way it looked, though. You could also paint or polish this. Some other possible button locations include thespot where the power window controls would go if you had them - obviously a bad choice if you do have them - and the foglight switch location on the 1999 cars.
Now that you've got the button in, you can practice pushing it. It will help if you make engine noises. If you get discouraged at any point in the upcoming procedures, simply return to this step for a while.
Some of this material is based on Sean Archer's writeup. I made a couple of small modifications, but it's basically the same setup.
What we need to do is cut the power to the accessories and complete the circuit that runs the starter. Sounds easy, right? Well, actually - it is. Both of these circuits run through the ignition switch. IGN2 is the accessory circuit and ST is the starter. Again, see Sean's site for some diagrams.
We'll need a relay to handle the power reliably. You can either use the dual pole relay (Siemens VF4-45F11) or a couple of inexpensive, easy to find single pole auto relays available at Radio Shack or Pep Boys. Using the single pole relays does complicate the wiring somewhat, but not too badly. One relay is used for each circuit.
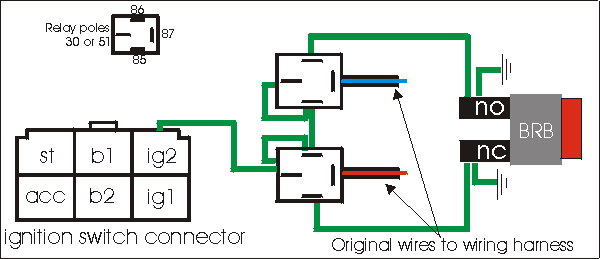
Here's a rough diagram
of how to connect the two relays. There's a big white connector that plugs into
the ignition switch that you need to unplug. It's got 6 wires on it. The two
that interest us are black with blue stripe (ST) and black with red stripe (IG2).
The IG2 circuit provides power for the relays. If you use a double-pole relay,
your wiring will look like Sean's version. All the new wiring is in green, and
the stock wires are in the appropriate colours. I've heard one or two reports
of the ignition switch connector changing a bit or of people getting confused
by the diagram - use the wire colours to identify the wires, not the positions
in the connector.
NOTE for 1999 and later Miatas: The wiring colours have changed. ST is white with a black stripe. IG2 is still black with red stripe, but don't get confused by the red wire with the black stripe that's nearby.
Look closely at the connector that plugs into the ignition switch. The wires have spade connectors at the end, and are held in by small clips. If you can pull these clips out of the way, you can remove the wires without having to cut or damage a thing. That way, if you ever want to go back to stock, it's simply a matter of putting the original wires back in the original connector. Easy!
Okay, so you've probably
looked no, and it's not that easy. Here's a cross section of what's going
on. The clip is outlined in red, the connector block is gray, and the wire and
spade connector are the gold and blue-striped thing.
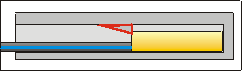
You need to get something
thin and sharp, and use that to pull the clip up so you can remove the wire.
I use a sharpened bicycle spoke, but any thin pokey thing should work. Here's
the above diagram, with the wire being removed. Cool, huh?

Now that you've got the wires removed, you can simply plug them into the relays in the appropriate places. By making a length of wire with spade connectors on each end, you can plug your own wires into the connector block. Make sense? You'll want to use beefy wire - the Miata uses 12-gauge for this, so don't skimp. It's also a good idea to solder the connectors on to the wire.
So - connect the relays as shown above, find a ground under the dash (I used the steering column, I think), and assemble the switching blocks on the back of the button. Now give it a try!